Day 25 : AR Tracking Quality Information using Unity, ARFoundation and ARKit.
Introduction
In a previous article here, we took a dive into how AR can be implemented in Classrooms for learning and education. We also touched upon a few design ideas and principles for a well made AR application with good experience.
One of the most important pieces of information you can show your users in an AR Experience is how good or bad the current tracking is. Since tracking largely depends upon the amount of light, distinct features of the real world. We can tell or show the user if the real world conditions are suboptimal or even bad for tracking.
This becomes a key part of ensuring that the user knows if AR isn’t working as well and what is required to correct the situation. Otherwise, the blame or rather it would look like it’s the fault of the application, which in this case it clearly isn’t.
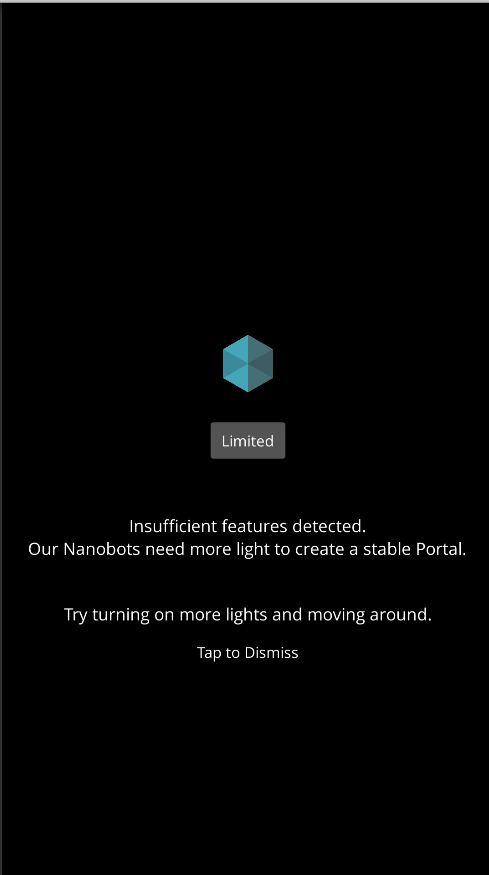
In this article, we’ll use ARFoundation to implement a script that will get information on the current tracking state. You can then show this information in any way you’d like. I will showcase a template that we use in one of our apps to show this information.
This is the template we used creating using Unity UI.
Getting Started
Prerequisites
- Unity 2019 or above
- AR Foundation 3.0.1 SDK from an earlier article here
The above article shows the installation of AR Foundation v2 but you can read this article on how to upgrade it to the latest version.
Implementation
There are two ways you could do this. One is with ARFoundation and the other is using ARKit solely.
Note here that some users have reported some issues with getting this to work on ARFoundation with iOS. The workaround is to use ARKit directly for iOS which I’ll also describe in this article. Until ARFoundation gets updated with a fix for this bug, you can use ARKit SDK directly if iOS is your target OS.
Using ARFoundation
We’ll use the ARSession to get the tracking state. You can read more about the class itself here.
You can this code that showcases all possible states.
    private void OnEnable()
    {
        ARSession.stateChanged += OnStateChanged;
    }

    private void OnDisable()
    {
        ARSession.stateChanged -= OnStateChanged;
    }

    private void OnStateChanged(ARSessionStateChangedEventArgs args)
    {
        switch(args.state)
        {
            case ARSessionState.None:
                break;
            case ARSessionState.CheckingAvailability:
                break;
            case ARSessionState.Installing:
                break;
            case ARSessionState.NeedsInstall:
                break;
            case ARSessionState.Ready:
                break;
            case ARSessionState.SessionInitializing:
                break;
            case ARSessionState.SessionTracking:
                break;
            case ARSessionState.Unsupported:
                break;
        }
    }
The OnStateChanged method will be called when the stateChanged event is raised by the AR Engine.
First, we can check what the total AR engine state is. Next, we can look at the tracking state itself.
        switch(ARSession.notTrackingReason)
        {
            case NotTrackingReason.None:
                break;
            case NotTrackingReason.Initializing:
                break;
            case NotTrackingReason.Relocalizing:
                break;
            case NotTrackingReason.InsufficientLight:
                break;
            case NotTrackingReason.InsufficientFeatures:
                break;
            case NotTrackingReason.ExcessiveMotion:
                break;
            case NotTrackingReason.Unsupported:
                break;
        }
That’s it. You can write this into any script and simply show your UI with the relevant message in your UI canvas.

Leave a Reply