Day 22 : Optimizing memory AR Applications using Unity and AR Foundation
Introduction
Why is optimization everything in mobile AR?
Augmented Reality or AR lets you deliver very engaging and immersive experiences letting you blend virtual objects into the real world. This means Creating and Engaging and Comfortable experience which would otherwise take away from the realism of the experience if the Application is performing poorly.
It is important to design and consider the technical implementation to make sure that the app doesn’t overheat the devices or even drain the battery.
When you’re developing with Unity and ARFoundation you have a few options and techniques that we can use to tweak and optimize our AR Application. That said, most of these also hold true for standard Games, Apps or even VR applications.
Unity Profiler
Unity profiler is THE tool to analyze the performance of your app. It is extremely detailed and offers the deepest levels of resource utilization of the application.
It gathers information like CPU, memory, GPU, rendering and audio usage and displays it. You can also pinpoint things in the scene to an exact gameobject and see how it’s behaving. CPU time and memory a single script is utilizing is also shown.
You can open the Profiler by Window -> Analysis -> Profiler.
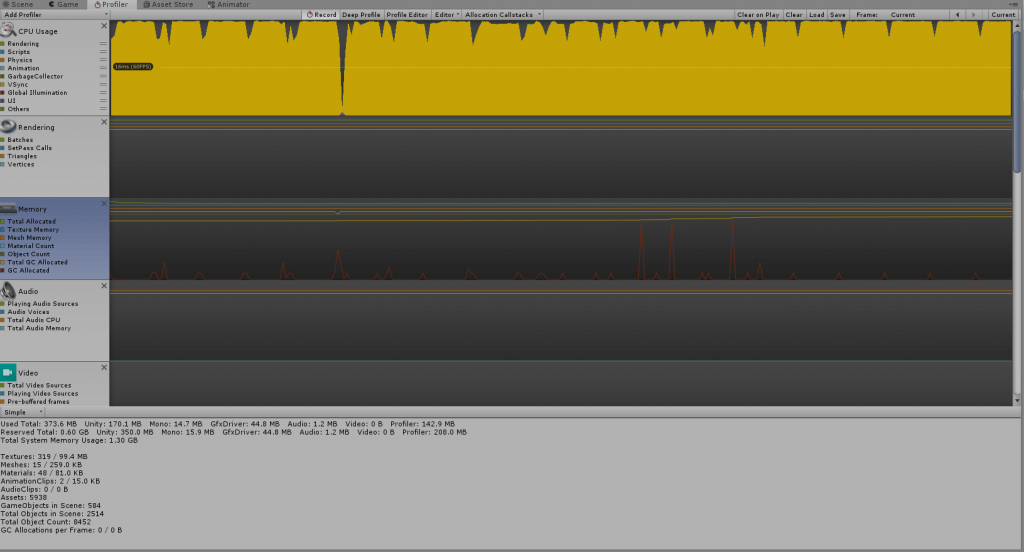
This is what a profiler session looks like when an app is running. You can learn more about profiler from here.
Any optimization first starts with Profiler. Deploy your app to a device and then connect it to the Profiler using the Editor Dropdown and selecting the connected device.
Frame Rate
A vast majority of the smartphones run at a 60 Hz screen refresh rate. This means, the screen refreshes or updates 60 times in a second. Although, some of the newer Android ones do go up to 120Hz. The higher the refresh rate, the more battery the screen utilizes and harder the CPU and GPU have to work to keep up. This becomes especially true with AR applications since the SOC on the device is already working hard with the world tracking, object, and plane tracking, etc.,
Unity will natively run at the highest frames-per-second that the device can push. This may be ideal in some cases, but the best way to implement this is by giving the user an option to configure between 30 Hz and 60 Hz depending upon the scenario. For the most use cases, 30 FPS is sufficient and this is true for the majority of the apps out there.
If a game or app relies on physics simulation or rapid reflexes, it should probably stick very closely to 60fps, because 30fps won’t deliver the necessary realism or responsiveness. If it’s a slower-paced app or game, then 30fps might be the more sensible target, since 60fps will consume extra system resources (in some examples we’ve seen, close to 100 percent more GPU usage and 30 percent more CPU) without significantly improving UX.
Whichever target you set, it’s worth bearing in mind that the generally-accepted industry standard is 30fps or higher.
When we set Unity to run at 30 FPS, the CPU and GPU can relax a bit and push out fewer frames resulting in lower usage and battery consumption.
Setting Target Framerate
You can set target framerate in Unity as following.
using UnityEngine;

public class FPSManager : MonoBehaviour
{
     //Locks framerate at 30 fps
     private void Awake()
     {
          Application.targetFrameRate = 30;
     }
}
An additional benefit to this is lower RAM usage. But How?
All smartphones especially, iPhones and iPads follow a Unified Memory Architecture. It means that both the CPU and GPU share the same memory unlike in Desktops and consoles where GPU has a dedicated memory called VRAM. Hence, reducing the app to run at 30 fps will reduce the RAM usage significantly. You can find a test of such on youtube here.
Handling AR Sessions
Typically, a full-fledged AR application will not run AR all the time. You might have some UI, Login, Store pages, etc in addition to the actual AR Experience. This can be done using AR Sessions. An AR session is when the device starts tracking everything around you by using the Camera and device data.
If not done correctly, the app will be running in AR Mode all the time, using up resources and battery life.
One way to achieve separation is by creating multiple scenes. Keep your AR experiences as a separate Scene and launch the scene by using the following method when needed.
SceneManager.LoadScene("SceneName");
The second way is to have multiple camera configurations. One for AR, second for non-AR. If you have followed our earlier articles here where we setup AR Session Origin and Session with ARFoundation. You would understand how these components are responsible for creating and managing AR Sessions.
To separate the functionality, you would child all the AR-related Trackables and camera’s to a gameobject and enable it when AR is needed while disabling the standard Unity Camera at the same time.
Handling Trackables
Once we’re able to control the AR session itself, we can now handle individual trackables like Plane Tracking, Face Tracking. For example, once you’ve placed an object or a 3d model on a plane, you can simply disable plane tracking to reduce resource utilization.
If you want to disable the whole AR Session you can do it by
arsession.enabled = true

//or

arsession.enabled = false
An AR Session can be started, paused, resumed, and stopped entirely. Enabling or disabling the component will start/resume or pause the session, respectively. If a session is “paused”, the system no longer tracks features in its environment, but if it is resumed at a later time, the system will attempt to recover and maintain previously detected features.
To Disable Plane detection
arplanemanager.enabled = false
Note that, even if you disable plane detection, the planes that are already being tracked won’t be lost. To delete all the detected planes you can use this.
foreach (var trackable in planeManager.trackables)
{
    trackable.gameObject.SetActive(false);
}
But when you disable the AR Session itself, the whole tracking and anchors are lost.
Bonus tip
Remember that most users use their mobile phones in a plastic case. They trap heat and when you are testing the AR applications or games make sure your test devices are in cases, as well. A fairy small tip, but one that is often overlooked.

Leave a Reply