Day 20 : Introduction to WebAR using ARKit with Safari and AR QuickLook Part 1
Introduction
With the release of ARKit 2 in 2018, Apple added a bunch of new features and APIs for AR development. One of the features is an enhancement to the already existing Quicklook API. Quicklook has already existed within iOS for a while now where we could quickly preview documents like PDFs and CSV’s along with text files and Images.
You might have used the Mail app on iOS to preview attachments. That is possible by using Quicklook.
Now with ARKit 2, Quicklook has been expanded to work with Augmented Reality using ARKit. This means the capability to preview and see augmented reality content and also sharing them like any other file.
This is made possible by USDZ, which is a new file format for rendering AR Models.
AR QuickLook
This feature can be implemented in two ways.
In the first method, we can use QLPreviewController to embed these into a native iOS application in XCode. This makes integrating AR Content within an app easier without having to worry about ARKit and all that implementation.
The second method is using Web AR through the Safari browser. This is what we’ll look at in this article.
How does it work with WebAR?
This is made possible by using a new file format called USDZ. Built-in iOS apps, such as Safari, Messages, Mail, News, and Notes, use Quick Look to display USDZ files of virtual objects in 3D or AR. This also includes real-time reflections and shadows.
This Quicklook view can then be embedded into any website. When the webpage is opening in Safari, iOS will detect the file and prompt an AR dialog.
AR QuickLook then handles the task of rendering the model into the environment, taking care of light conditions, scanning the surface, placing the object into the environment, and holding its place even when the camera moves around.
In this article, we’ll look at the USDZ files and how to convert your 3D Models into USDZ format. In the following Part 2 of this article, we’ll upload this article on a hosting website and create a demo webpage. Finally, we’ll host the webpage on GitHub for free and experience it using the Safari browser.
What Is USDZ?
USDZ is derived from a format called USD which stands for Universal Scene Description. USD allows content creators to create a 3D scene by composing” many modular data sources (files) together into successively larger and larger aggregations. This format is from Pixar.
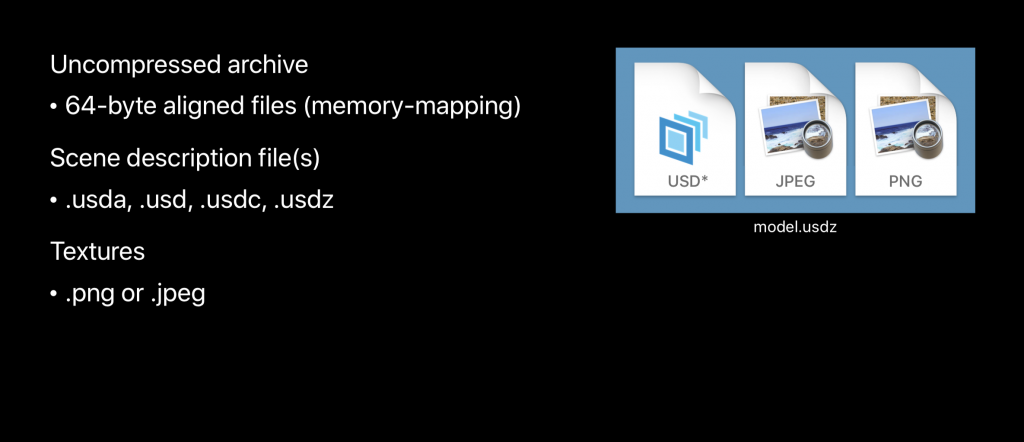
For larger scenes, it becomes harder to organize different files together. This is where Apple in Collaboration with Pixar introduced the USDZ format. USDZ is basically an archive of the USD scene file and the additional files. The Archive can also be a zip, which is compressed. Hence, the Z in USDZ.
Thus, a single USDZ contains all the mesh data, binary data and all the textures of the model.
The anatomy of a USDZ file is as follows.
Converting Existing Models into USDZ
Now, how do we convert our models into USDZ?
It’s fairly simple, Apple provides two tools to convert your models.
First, is a Mac application called Reality Converter. It is a simple tool that allows us to simply drag and drop models and export them. It supports 3D file formats, such as .obj, .gltf and .usd.
You can download it from here.
Once downloaded, open it and drag and drop your models into it directly. You should be able to preview your model and also completely change its properties to your will.
Once you’re done go to File -> Export and enter the model name. This will then be exported into a .USDZ file.
The second method is using Command line tools using Terminal.
This tool is based on Python and has other capabilities like the validation of the assets, managing the mesh and adding multiple attributes like different texture maps. You can read more technical details about it in this WWDC 2019 session.
To convert your existing model to USDZ, you need to download the Python tool. After downloading and unzipping the file you’ll see a lot of files which might be confusing but it’s actually fairly simple. Find the USD.Command file and double click to open it.
It should open up in the Terminal app.
Before this, Go to Desktop and create a folder to store your source 3d models. Le’ts name it models.
Now in the Terminal app type in
cd Desktop/models
Next, use the usdzconvert command followed by the name of your model with extension.
usdzconvert scene.gltf
Now it should start processing and once done the output will be like this.
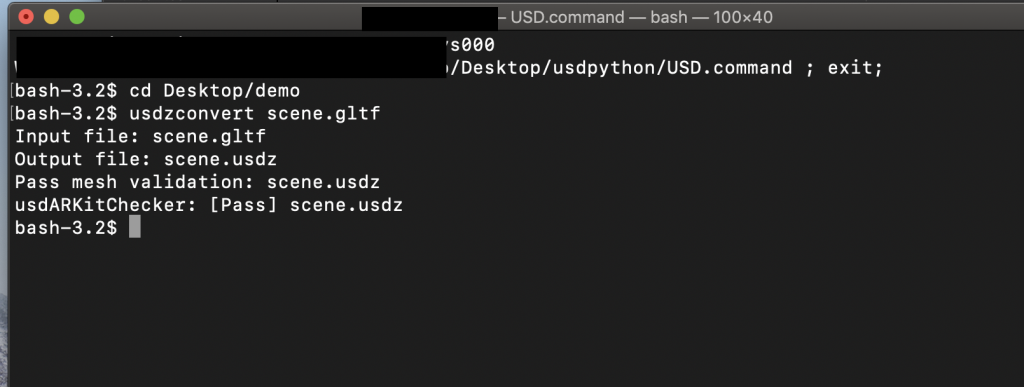
You will have the .usdz file in the same folder.
I would suggest using the Reality Converter if you’re not familiar with command-line tools.

Leave a Reply